












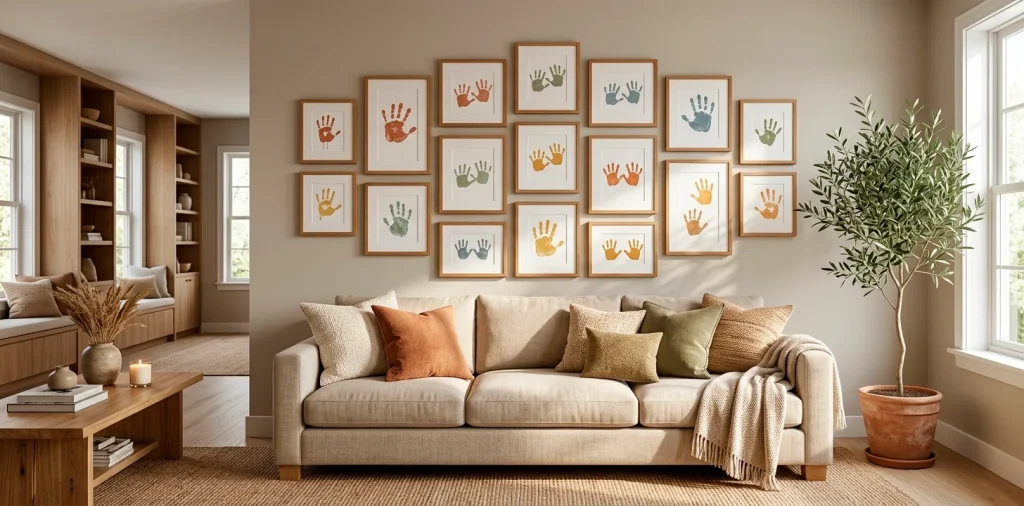

Forget the panic-buying of overpriced bouquets that wilt by Tuesday. This year, we are crafting a heartfelt handprint gallery wall for Mother’s Day that genuinely pulls at the heartstrings. I tried this last year, and let me tell you, mom actually cried happy tears. It is deeply personal, beautifully messy, and absolutely timeless.
Why a Handprint Wall Beats Store-Bought Cards
Have you ever noticed how expensive greeting cards just get shoved into a drawer after two days? A thoughtfully designed gallery wall completely fixes that problem. You transform fleeting childhood moments into permanent, stunning home decor that she gets to enjoy year-round.
Plus, kids grow up way too fast, IMO. Capturing those tiny, sticky fingers in a beautifully framed art piece creates a visual time capsule. You get a powerful emotional anchor for your hallway or living room, completely bypassing those cheesy store-bought alternatives.

Choosing the Right Spot in Your Home
Location makes all the difference when displaying sentimental pieces. You want a high-visibility area that does not feel overly cluttered. Hallways, staircases, or that blank stretch of drywall near the dining table work wonders. I personally love placing family-centric art in the main living space where everyone gathers. Avoid direct, harsh sunlight if possible, as UV rays easily fade colorful craft paint over time. Measure the width of your chosen wall first to ensure your final frame arrangement actually fits the space properly without looking cramped.

Gathering the Right Supplies (Without Losing Your Mind)
You definitely need the right tools before you invite chaos into your craft space.
Do yourself a favor and avoid cheap, watery craft paints. Non-toxic, washable acrylics or tempera paints work best for creating vibrant, opaque handprints.
Canvas or heavyweight cardstock? Definitely go with cardstock. It absorbs the moisture without warping, leaving crisp edges on those little palm prints.
Essential materials for handprint art:
- Washable, non-toxic craft paint
- High-quality 110lb white cardstock
- Foam craft brushes for smooth application
- Lots of baby wipes

Choosing a Color Palette That Actually Looks Good
Nobody wants a neon green handprint clashing with their elegant beige sofa. Selecting a cohesive color scheme elevates your DIY project to designer levels. Stick to shades that already exist in your room’s decor.
Monochromatic tones look incredibly sophisticated. Try stamping the prints in varying shades of dusty blue, sage green, or warm terracotta. Using muted, earthy colors ensures the artwork blends seamlessly with modern interiors rather than looking like a kindergarten classroom project. If you love a sophisticated aesthetic, check out these timeless black and white portrait ideas for complementary decor inspiration.

Prepping the Kids (And the Mess Zone)
Preparation is your absolute best friend here. Lay down a canvas drop cloth or old newspapers because, FYI, toddler hands move with the speed of light. Have damp paper towels on standby immediately. I highly recommend doing a quick “dry run” with the kids first. Just ask them to press their clean hands firmly onto the paper to practice the motion. Explaining the process calms them down and ensures they do not wiggle mid-stamp. A prepared environment equals fewer paint splatters on your favorite rug.

The Stamping Process: Fast, Fun, and Slightly Chaotic
Now comes the main event. Grab that foam brush and paint your kid’s hand.
A thick coat creates a sloppy, unreadable print, so keep the paint layer thin and even. Gently press their hand down onto the center of the cardstock. Hold it securely for three seconds to transfer the color.
Lift straight up! If they wiggle, you get a smear. But honestly? Those imperfect, slightly smeared prints usually hold the most charm. Just laugh it off and try again if it looks like a modern art blob. We want authenticity, not machine-printed perfection.

Framing Your Tiny Masterpieces
Do not stick these directly onto the wall with tape. Frames instantly elevate the handprints from “fridge art” to actual gallery-worthy decor.
You absolutely need cohesive framing. Matching wooden frames with wide white mats provide a high-end, professional look. Crisp white mats draw the eye directly to the colorful print. Black metal frames also work beautifully for a more contemporary, sleek vibe. Remember to use non-glare glass to protect the prints while keeping them visible from every angle in the room.

Designing the Gallery Layout
Nailing the layout prevents your wall from looking like a chaotic garage sale display.
Grab some kraft paper and trace your frames. Cut out the paper templates and use painter’s tape to arrange them on your wall before hammering any nails.
Keep the spacing consistent. I personally prefer a two-inch gap between each frame for a clean, highly organized aesthetic.
Gallery wall layout options:
- Symmetrical grid for identical frames
- Staggered rows for dynamic energy
- Mixed shapes for an eclectic feel

Adding Meaningful Text and Typography
You can easily enhance the visual impact by adding customized text. Carefully write the child’s name, their exact age, and the date at the bottom of the cardstock using a fine-tip archival pen. Some parents also print a beautiful, meaningful quote about motherhood to place in the center frame of the gallery. This clever technique breaks up the visual repetition of the handprints and gives the eye a natural resting place. These tiny details transform a fun craft into a breathtaking heirloom.

The Big Reveal for Mom
Timing matters tremendously. Reveal the wall when the house is quiet and she has a moment to actually breathe and take the surprise in.
You just created a physical, stunning representation of family love. Ensure the lighting highlights the frames beautifully before you walk her into the room.
Watching her recognize those tiny handprints is honestly priceless. It beats breakfast in bed every single time ❤️. Want to go completely all out? You might also want to read how to curate a designer Mother’s Day gift basket to present alongside the big wall reveal.

Conclusion
Creating a handprint gallery wall for Mother’s Day requires a little paint, some patience, and a whole lot of love. You get to freeze time, capture those fleeting childhood moments, and transform your hallway into a stunning museum of memories. Mom gets a personalized, beautiful gift she actually wants to look at every single day. Have you picked out your frame styles yet, or are you still wrangling the kids for paint time? 🎨 Let me know in the comments below!
Related posts
See All15 Vintage Circus Inspired Details for Playful Kids Bedroom Decor
Bring the magic of the big top home! Discover 15 playful, vintage circus-inspired decor details that will transform your kid's …
Read moreThe Complete Guide to Styling a Dining Room Credenza for Everyday Elegance
Give your dining room credenza the ultimate glow-up. Discover easy, elegant styling tips that balance everyday function with show-stopping design.
Read more15 Dried Citrus and Cinnamon Garlands for a Naturally Cozy Kitchen
Forget mass-produced decorations. Transform your kitchen into a naturally cozy, aromatic sanctuary with these 15 beautiful dried citrus and cinnamon …
Read moreThe Dog-Friendly Camper: Designing a Van Interior for Your Pets
Transform your camper van into the ultimate dog-friendly adventure mobile! Discover clever interior design hacks, durable materials, and cozy setups …
Read more