












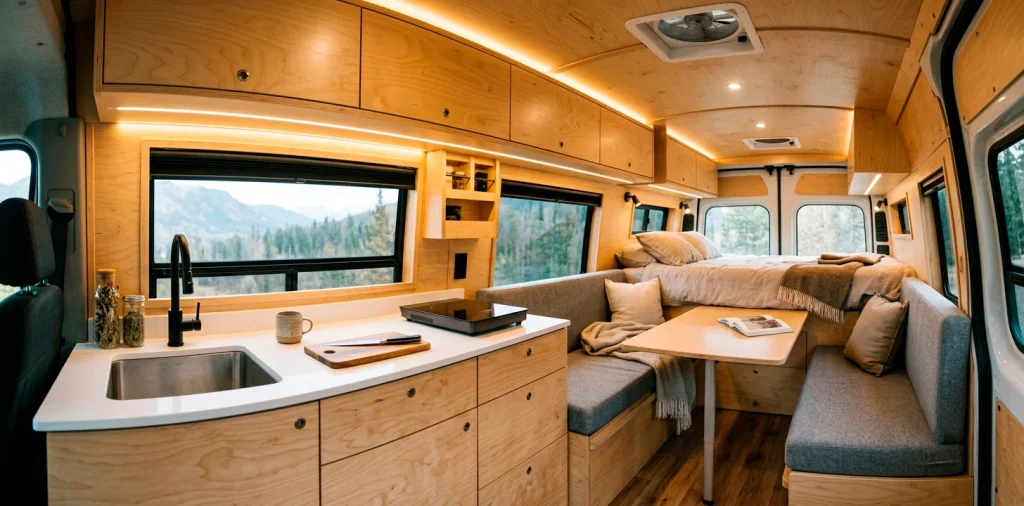

Building van cabinets tests your sanity. I remember staring at a crooked shelf in my first Sprinter build, wondering why I didn’t just buy a tent. You want that custom, seamless look that screams luxury, not a high school woodshop disaster. Getting professional results inside a metal box with zero straight lines is tough, but totally doable. Let’s fix that.
Designing the Layout
Before you cut a single piece of wood, you need a solid plan. I always mock up my van layout using cheap cardboard. It saves you from making catastrophic mistakes with expensive plywood later on.
You literally tape cardboard boxes together and walk around the space. Does your knee hit the counter when you cook? Fix it now. Mapping things out physically beats staring at a 3D model any day. Plus, it gives you a real feel for the flow and space. If you prefer keeping things bright and airy, check out some neutral van interior cream beige oak setups to inspire your material choices.

Choosing the Right Materials
Baltic birch plywood is your best friend here. Sure, the price tag might make you cry a little, but it holds screws like an absolute champ and handles the constant vibration of the road flawlessly. I tried using cheap MDF once in an older build. Big mistake. The humidity wrecked it in a month, and the whole structure sagged like a wet noodle. Stick to half-inch Baltic birch for the cabinet bodies and three-quarter inch for the doors and structural supports. You get a remarkably strong, lightweight build that actually lasts through thousands of miles of off-road adventures.

The Magic of Scribing
Ever wondered why van walls look so frustratingly curved? Automakers do not care about your DIY cabinet dreams.
You must learn how to scribe. You grab a cheap compass, trace the exact contour of the van wall onto your wood, and cut precisely along that line with a jigsaw.
I messed this up three times before figuring out the trick. Always keep the compass completely level while tracing.
Once you master this skill, your cabinets will hug those weird metal curves perfectly. A seamless fit instantly elevates your build from amateur hour to professional quality.

Selecting Heavy-Duty Hardware
Normal house hinges fail miserably in moving vehicles. IMO, nothing ruins a trip faster than hearing plates smash because a cheap catch gave out. You need heavy-duty hardware. Essential hardware upgrades:
- Heavy-duty gas struts for overhead doors
- Marine-grade push-button latches
- Soft-close European concealed hinges
Spend the extra money on these upgrades. They keep everything locked down tight and give your cabinetry a premium feel. Your sanity on corrugated roads depends entirely on your hardware choices.

Framing the Foundation
You have two main choices for framing: traditional wood framing or extruded aluminum. I personally love aluminum extrusion because it bolts together perfectly square every single time.
Wood framing costs significantly less and feels more approachable. You just need to ensure you use high-quality wood glue and pocket hole screws to prevent any joints from failing.
Squeaking cabinets will drive you absolutely insane on a long drive. Always use blue thread locker on your bolts if you go the aluminum route, otherwise the vibrations shake everything apart.

Flawless Edge Banding
Exposed plywood edges scream DIY. You buy a roll of iron-on edge banding and simply melt it onto the raw edges of your plywood doors. It takes seconds but completely transforms the look of your entire kitchen setup.
After ironing it on, you take a sharp chisel or a dedicated edge trimmer and shave off the excess material. Sand it down lightly, and suddenly you have a solid, professional-looking cabinet door that looks custom-built. Do not skip this step; it seals the wood and prevents future moisture damage. It genuinely stands as the cheapest magic trick in the van-building rulebook.

Perfecting the Finish
Paint or laminate? That remains the ultimate question.
I prefer high-pressure laminate for flat surfaces because it resists scratches from heavy gear. You apply it with contact cement and route the edges perfectly flush.
Painting requires tedious, endless prep work. You must prime, sand, paint, sand, and paint again to get a factory-smooth finish that reflects light beautifully.
If you choose paint, always use a cabinet-specific enamel. Regular wall paint chips off the very moment you bump it with a cooler, leaving ugly scars on your hard work.

Integrating the Ugly Stuff
You need to hide your plumbing, electrical wires, and diesel heater vents inside these cabinets without restricting your access. I design false panels with magnetic catches for this exact purpose. You get the sleek, seamless aesthetic on the outside, but you can instantly pop the panel off when a fuse blows or a water pipe leaks. Keep your ventilation cutouts exceptionally clean by using a router template. Messy, crooked jigsaw cuts around a heater vent look terrible and instantly ruin the professional vibe you worked so hard to establish throughout the van.

Maximizing Hidden Storage
Space acts as a premium commodity in any camper van. You must utilize every single inch, including the toe kicks under your base cabinets. I build shallow sliding drawers right into the kickboards to store flat items like baking sheets and dirty hiking boots.
Another fantastic trick involves building false bottoms in your overhead cabinets. You stash your valuables up there, and no one ever knows they exist.
Creative storage solutions make your compact van feel massive. If you want more sneaky ideas, peek at these slide-out kitchens hidden prep spaces van concepts.

Final Adjustments
Crooked cabinet doors instantly ruin the seamless look you spent weeks trying to achieve. You must invest in a good laser level and an adjustable cabinet hardware jig. These tools guarantee your metal handles line up perfectly across every single door face.
I spend hours tweaking the adjustment screws on my European hinges. You turn one screw to shift the door left, and another to tilt it up. Patience pays off immensely here. Dialing in those uniform, tight gaps makes your cabinetry look like it rolled directly out of a high-end, million-dollar factory.

Conclusion
Building seamless van cabinets demands patience, a lot of sawdust, and a strict refusal to settle for good enough. You plan meticulously, scribe perfectly, and choose the absolute best hardware to bring that professional look to life. It ultimately transforms your rolling metal box into a genuine luxury home. Which cabinetry trick are you tackling first? Let me know in the comments! 🚐
Related posts
See All15 Vintage Circus Inspired Details for Playful Kids Bedroom Decor
Bring the magic of the big top home! Discover 15 playful, vintage circus-inspired decor details that will transform your kid's …
Read moreThe Complete Guide to Styling a Dining Room Credenza for Everyday Elegance
Give your dining room credenza the ultimate glow-up. Discover easy, elegant styling tips that balance everyday function with show-stopping design.
Read more15 Dried Citrus and Cinnamon Garlands for a Naturally Cozy Kitchen
Forget mass-produced decorations. Transform your kitchen into a naturally cozy, aromatic sanctuary with these 15 beautiful dried citrus and cinnamon …
Read moreThe Dog-Friendly Camper: Designing a Van Interior for Your Pets
Transform your camper van into the ultimate dog-friendly adventure mobile! Discover clever interior design hacks, durable materials, and cozy setups …
Read more