












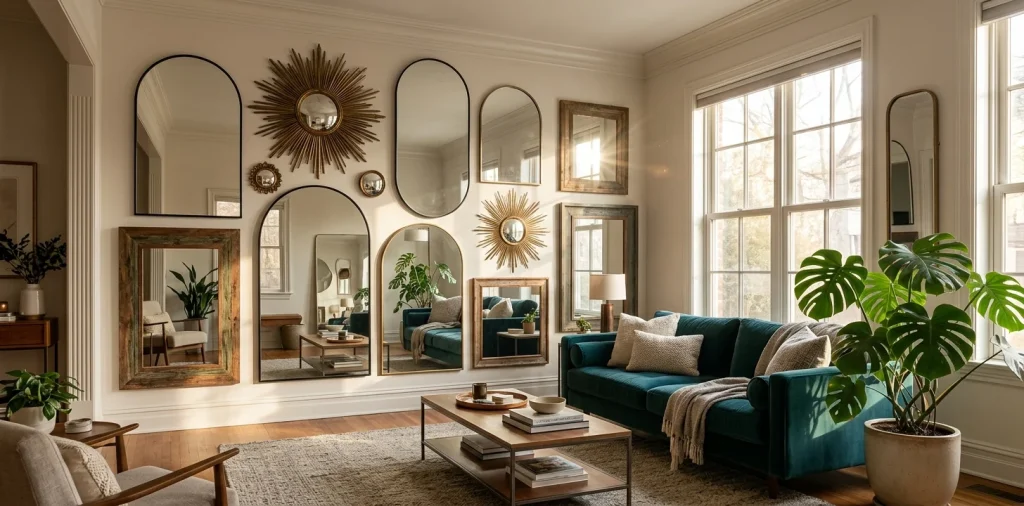

Blank walls stare back at you, practically begging for some personality. You could hang another generic print, but why settle when you can bounce light around like a magician? A statement mirror wall transforms a dark, cramped room into a spacious, glowing sanctuary. I finally tackled my own hallway last month, and the difference is actually unreal. Ready to build yours?
The Magic of a Statement Mirror Wall
Let me be completely honest with you. Mirrors possess serious interior design superpowers. They visually double your square footage and capture every ounce of natural light slipping through your windows.
You instantly trick the eye into seeing more space. Plus, you get the added bonus of checking your outfit from multiple angles before walking out the door. Win-win, IMO. 😉
I genuinely believe every home needs at least one dramatic reflective moment. The strategic placement of glass completely shifts a room’s energy. It breathes life into stale corridors and makes tiny dining rooms feel like grand banquet halls.

Sourcing Your Reflective Treasures
Hunting for the perfect pieces is half the fun, though it definitely requires some patience. You do not want a wall full of identical, mass-produced squares that look like a cheap gym studio. Hit up your local thrift stores, scour estate sales, and stalk online vintage marketplaces. Finding unique, weathered glass adds instant character and soul to your display. Keep an open mind because a chipped, ugly frame often hides a glorious antique mirror just waiting for a quick coat of fresh paint. I once scored a massive brass sunburst for ten bucks!

Mixing Shapes and Eras
Cohesiveness matters, but perfection just looks boring.
You want tension. Pair a sleek, modern frameless oval right next to a chunky, ornate Victorian rectangle. That contrast creates immediate visual interest.
If everything matches flawlessly, your wall loses its curated charm and starts looking like a sterile hotel lobby.
To keep things grounded, I highly recommend picking a unifying element. Design elements that balance the chaos:
- Vintage brass paired with matte black metals
- Oversized arches anchored by small geometric shapes
- Heavily distressed wood flanking pristine modern glass

The Layout Strategy
Please, for the love of your drywall, do not just start hammering nails randomly. You will deeply regret it when you end up with a chaotic, crooked mess. Trace every mirror onto Kraft paper, cut out the templates, and tape them directly to your wall using painter’s tape.
This foolproof method lets you physically see the spacing and balance before committing. Leave roughly two to three inches between each frame to prevent a cluttered look. Step back, adjust the paper cutouts, and walk away for a few hours. A fresh perspective always highlights weird gaps you missed initially.

Fixing Them Securely to the Wall
Gravity remains your biggest enemy here. Heavy glass requires serious respect, so ditch those flimsy little picture wire hooks immediately. You must use proper drywall anchors or locate the studs for any piece weighing over ten pounds. I learned this the hard way when a heavy antique piece ripped straight out of my plaster in the middle of the night. Terrifying, FYI. Invest in French cleats for massive statement pieces; they distribute the weight perfectly and keep the mirror completely flush against the wall.

Frame Finishes Matter
The frames you choose act as the jewelry for your room, dictating the overall mood of the space.
I usually lean towards warm metallic finishes because they bounce the light in a softer, more flattering way. Brass and gold tones inject instant elegance, while matte black frames ground a bright room with a touch of modern masculinity.
Don’t shy away from mixing these metals, either. A deliberate blend of silver and gold feels effortlessly chic and stops the wall from looking too flat. Just ensure the finishes share a similar level of shine or distress so they talk to each other politely.

Lighting Your Masterpiece
Ever noticed how bad lighting ruins a good outfit? The same applies to your decor. You just built a giant light reflector, so you better give it some good light to bounce! Strategic illumination transforms your mirror wall from a daytime feature into an atmospheric nighttime mood setter.
Install a pair of stylish sconces on either side, or aim a subtle track light directly at the display. Warm-toned bulbs create a romantic, inviting glow that radiates throughout the entire room. Avoid harsh overhead lighting, which simply glares off the glass and blinds anyone trying to admire your hard work.

Funky Alternatives and Quirky Twists
Sometimes standard mirrors just don’t capture the vibe you crave.
If you want something bolder, consider tinted glass. Smoked grey or bronze mirrors add a moody, seventies-inspired coolness that completely changes the atmosphere.
You can also experiment with unexpected shapes like wavy squiggles, fragmented mosaics, or even repurposed mirrored tiles to break up the traditional look.
I adore adding a bit of playful reflection into personal spaces. It keeps the design from taking itself too seriously. If you really want to lean into that playful, reflective energy, you might love trying some DIY disco ball mirror hacks.

Conclusion
Building a statement mirror wall takes a little muscle and a lot of patience, but the payoff is absolutely unmatched. You instantly breathe new life, visual space, and glorious light into your home. Grab some Kraft paper, start hunting for those perfect frames, and trust your creative instincts to guide the layout. Which vintage style are you grabbing first? Let me know in the comments!
Related posts
See All15 Vintage Circus Inspired Details for Playful Kids Bedroom Decor
Bring the magic of the big top home! Discover 15 playful, vintage circus-inspired decor details that will transform your kid's …
Read moreThe Complete Guide to Styling a Dining Room Credenza for Everyday Elegance
Give your dining room credenza the ultimate glow-up. Discover easy, elegant styling tips that balance everyday function with show-stopping design.
Read more15 Dried Citrus and Cinnamon Garlands for a Naturally Cozy Kitchen
Forget mass-produced decorations. Transform your kitchen into a naturally cozy, aromatic sanctuary with these 15 beautiful dried citrus and cinnamon …
Read moreThe Dog-Friendly Camper: Designing a Van Interior for Your Pets
Transform your camper van into the ultimate dog-friendly adventure mobile! Discover clever interior design hacks, durable materials, and cozy setups …
Read more