


Introduction
Let’s be honest, most kids’ rooms look like a tornado hit a toy factory. We all want that serene, architectural beauty we see in magazines, but then reality hits. You look at the price tag for custom carpentry, and suddenly that pile of plastic toys doesn’t look so bad. But here is the secret: you don’t actually need a contractor to get that high-end look.
I have always loved the transitional style because it hits that sweet spot between traditional warmth and modern clean lines. It feels timeless, not trendy. And when you are designing a shared room, you need something that lasts. You want a space that handles the chaos of two kids but looks polished enough to show off to guests (or just to stare at while you drink your morning coffee).
In this guide, I’m walking you through how to fake that expensive “built-in” bunk bed look, how to mix metals like a pro, and how to create private sanctuaries for your kids without building new walls. We are doing this with off-the-shelf furniture and smart decor hacks. Ready to transform that bedroom? Let’s get to work.
The “Faux” Built-In Bunk Hack
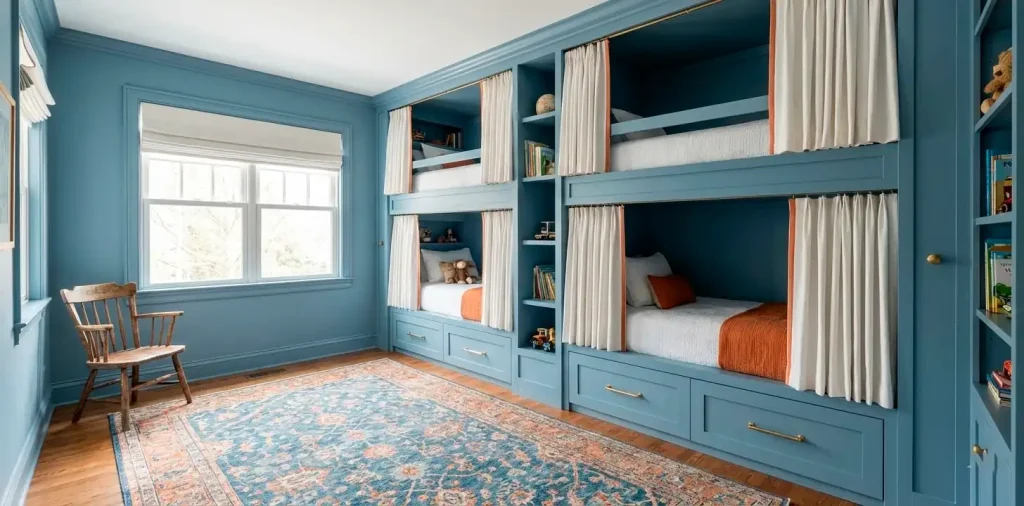
Everyone obsesses over those wall-to-wall built-in bunk beds. They look sturdy, permanent, and incredibly expensive. Do you know why? Because they usually cost five figures. But you can achieve 90% of that look for a fraction of the cost by using a standard sturdy bunk bed and a little creativity.
The trick lies in monochromatic painting. When you paint the bunk bed frame the exact same color as the walls and the trim, it tricks the eye. The furniture stops looking like a separate piece of wood you bought online and starts looking like part of the architecture. I personally love a deep, dusty blue for this. It hides fingerprints (a miracle, honestly) and feels sophisticated enough for a teenager but fun enough for a six-year-old.
To really sell the “built-in” effect, push the bed into a corner and add some molding or trim to the wall where the bed meets the plaster. It closes the gap. Suddenly, that gap where lost socks go to die disappears, and you have a seamless, high-end look.
")

[ynm_products ids=”2433,2432″ columns=”4″]
Elevated Privacy: The Curtain Solution
Sharing a room teaches kids great life lessons, but it also teaches them how to annoy each other instantly. Everyone needs a place to hide. This is where the privacy curtain comes in. It is not just a functional necessity; it is a massive style opportunity.
Don’t just slap up a shower curtain rod. That screams “college dorm.” For a transitional look, you want fabric that has some weight to it, like a heavy cotton or a linen blend. I love the look of crisp white fabric against dark blue walls—it pops. To add that designer flair, look for curtains with a bold accent trim, maybe a burnt orange or a deep navy ribbon edge.
Install a track system on the ceiling for the top bunk or under the top bunk frame for the bottom sleeper. This allows the curtain to glide smoothly and tuck away completely when they want to be social. FYI: This also turns the bed into a fort, which automatically makes you the coolest parent in the world.


[ynm_products ids=”2434,2436″ columns=”4″]
Smart Storage That actually Looks Good
Small bedrooms demand smart solutions. If you just shove bins under the bed, it looks messy. The goal here is integrated storage. If your bunk bed didn’t come with drawers, you can buy rolling drawers separately. The key? You guessed it—paint them to match the bed.
Brass details are the secret weapon of the transitional style. Swap out whatever cheap plastic or plain wood knobs come with your furniture for solid brass hardware. A simple cup pull or a sleek brass bar handle instantly elevates the piece. It contrasts beautifully against dusty blue or sage green paint.
Also, consider the inside of the bunk. Install a small floating shelf or a niche box inside each sleeping nook. This gives each child a spot for a water bottle, a book, and their favorite Lego figure (that you told them not to bring to bed). It keeps the floor clear and the clutter contained.


[ynm_products ids=”2686, 2687″ columns=”4″]
Lighting: The Jewel of the Room
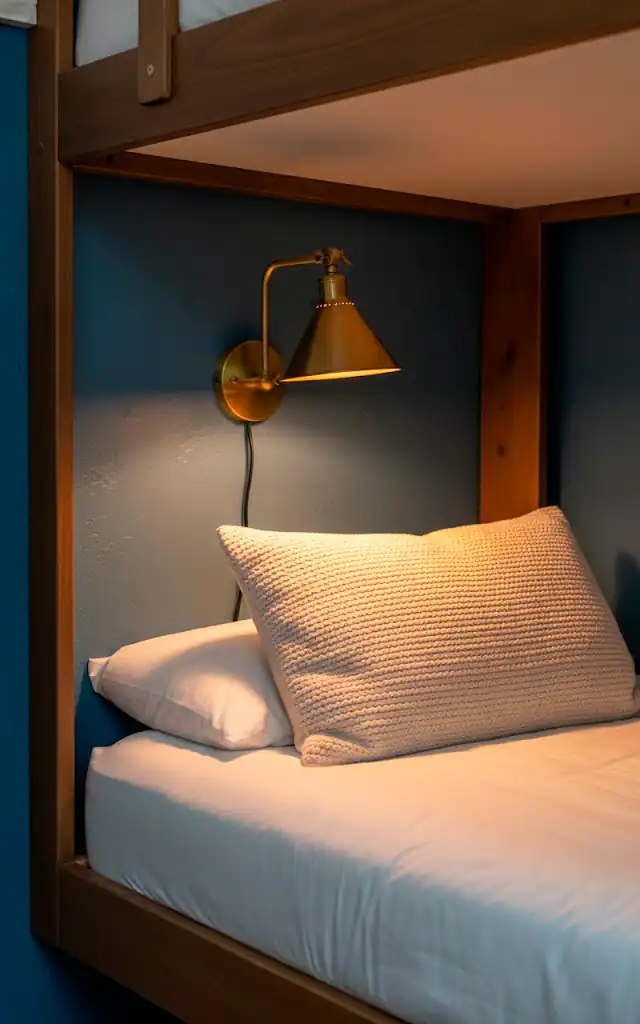
Lighting makes or breaks a room. In a shared room, overhead lighting is rarely enough, and it’s usually annoying if one kid wants to read and the other wants to sleep. You need individual sconces.
You might be thinking, “I am not hiring an electrician to wire lights into a bunk bed.” You don’t have to. I am obsessed with battery-operated wall sconces or plug-in types with cord covers. They look hardwired, but they install with two screws. IMO, this is the best invention for renters and budget renovators.
Go for a brass finish to tie in with your drawer handles. Position them inside the bunk area so they act as a personal reading light. It adds warmth and that “hotel” vibe. Plus, it gives the kids ownership over their little space. They control their own environment, which reduces bedtime battles.

Textures and Finishing Touches
Now that we have the “bones” of the room sorted, let’s talk about the soft stuff. A transitional room shouldn’t feel stark. You need to layer textures to make it cozy.
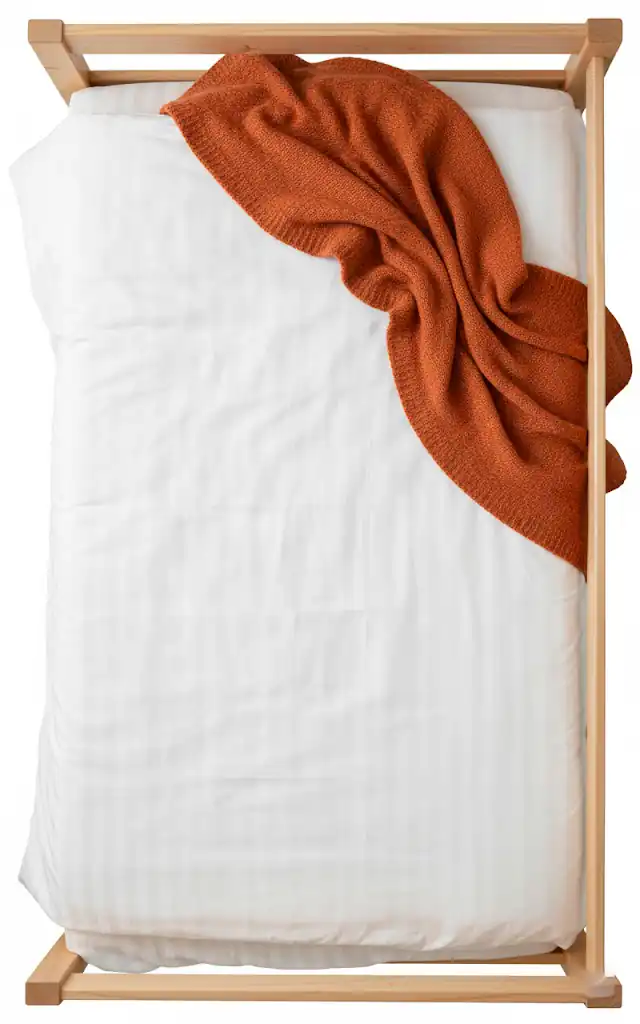
Start with the bedding. Keep the sheets neutral or a subtle pattern—let the structure of the room speak for itself. But do add a chunky knit throw or a velvet lumbar pillow in a contrasting color (like rust orange or mustard yellow) to break up all the blue.
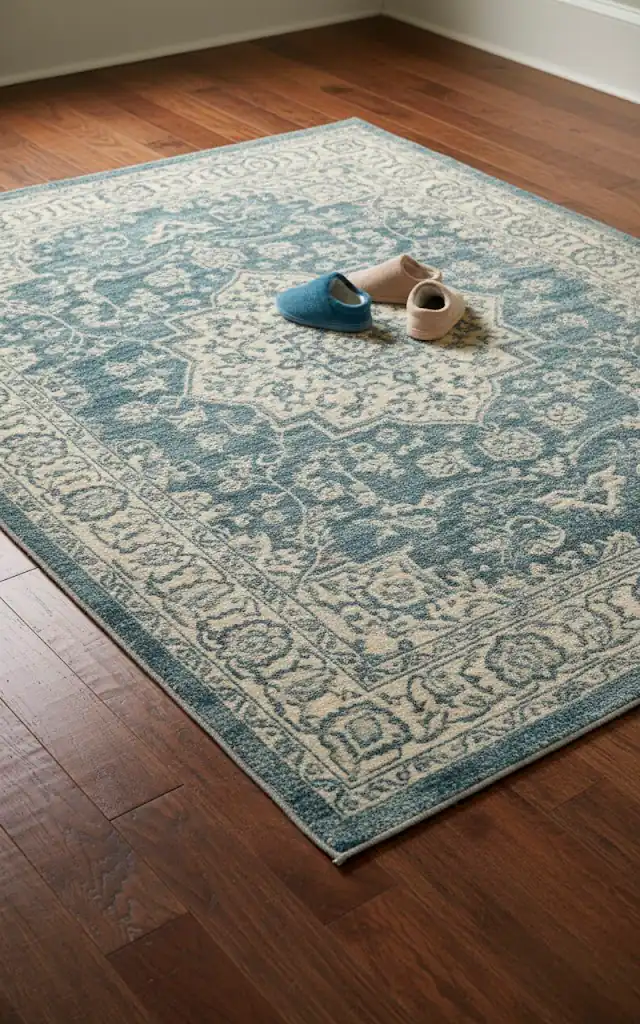
Don’t forget the floor. A vintage-inspired rug creates a soft landing pad and anchors the room. Look for something with a low pile so it’s easy to clean but has a distressed pattern. It hides stains wonderfully 🙂 and adds that “lived-in” historic charm. These layers make the room feel finished and intentional, rather than just a place where people sleep.
Conclusion
Creating a high-end transitional kids’ room doesn’t require a lottery win. It requires a bit of paint, some thoughtful hardware swaps, and the courage to drill a few holes for curtains. By treating the bunk beds as architecture rather than just furniture, and by giving each child their own private, lighted nook, you create a space that functions beautifully and looks incredible.
The best part? When the kids eventually grow out of the bunks, you haven’t sunk thousands into permanent carpentry. You can just unscrew the “built-ins,” patch the holes, and reconfigure. But until then, enjoy the peace and quiet of those privacy curtains. You’ve earned it.
Have you tried hacking IKEA furniture for a built-in look? I’d love to hear how it went!
Related posts
See AllEarthy Terracotta Sunroom Ideas for a Mediterranean Vibe
Transform your space into a sunny European retreat. Discover simple, earthy terracotta sunroom ideas that bring authentic Mediterranean vibes straight …
Read more15 Playful Memphis Style Attic Loft Ideas with Graphic Shapes
Transform your attic loft with playful Memphis style decor! Discover 15 bold ideas using graphic shapes, vibrant colors, and quirky …
Read more15 Custom Built-In Bed Ideas for a Luxury Kids Room
Ready to transform that chaotic playroom into a high-end sanctuary? Discover 15 jaw-dropping built-in bed ideas that blend luxury, smart …
Read moreA Step-by-Step Guide to Total Laundry Room Organization
Transform your chaotic laundry space into an organized, functional oasis with this step-by-step guide. We share smart storage hacks, sorting …
Read more