


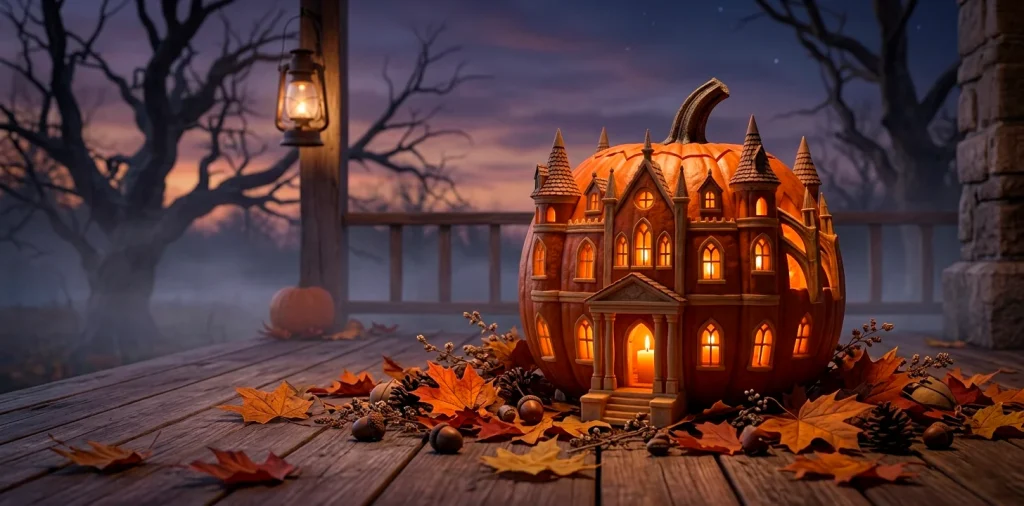

Ever look at those standard triangle-eye pumpkins and think they look a bit basic? Yeah, me too. This year, we are taking porch decor to the next level by carving intricate architectural masterpieces. Turning a plain squash into a glowing miniature gothic mansion is way easier than it sounds. Grab your tools and let’s create something spectacular! 🎃
Picking the Perfect Structural Canvas
You cannot build a stunning gothic cathedral on a lumpy, uneven foundation. Structural integrity matters immensely when we create these tiny mansions.
Hunt for tall, heavy pumpkins with at least one completely flat side. The extra weight gives you thicker walls, which you absolutely need for carving tiny window panes and arched doorways without the whole thing collapsing. I learned this the hard way last year when my mini castle crumbled into a sad orange pile. Give the pumpkin a good thump; you want a solid, hollow sound that screams prime real estate.

Ditching the Flimsy Plastic Tools
Those cheap plastic grocery store tools simply will not cut it for intricate architectural details. You need extreme precision. Head to the craft store and grab a set of clay ribbon tools, a sharp craft knife, and some linoleum cutters. Linoleum cutters work absolutely flawlessly for etching realistic brick textures into the outer skin without piercing all the way through. Trust me, upgrading your toolkit makes a massive difference when you start carving tiny overlapping roof shingles. Quality blades save you hours of frustration!

Prepping and Gutting Like a Pro
Ready for the messy part?
Cut your lid at an inward angle so it never falls inside.
Now, scrape the inside walls until they feel perfectly smooth and roughly an inch thick. You must remove every single stringy bit.
Wall thickness dictates your success. If you leave the front wall too thick, light refuses to shine through your faux stained-glass windows. If you scrape it too thin, your miniature haunted house loses critical structural support. Grab a heavy-duty metal spoon or a dedicated pumpkin scraper to carve out a clean, perfectly even interior surface.

Transferring Your Blueprint
Freehanding a massive cathedral sounds like a fun flex, but IMO, it usually ends in utter disaster. Print out an architectural silhouette or a detailed haunted house template. Tape your paper template securely to the flattest side of your squash. Next, use a push pin or a needle tool to poke tiny dots along the design lines, transferring your blueprint directly onto the rind. Peel the paper away, and you have a perfect dot-to-dot guide for your blade. It takes real patience, but this step guarantees perfectly straight columns and flawless arched doorways.

Etching the Masonry Textures
This is where the real magic happens. We build the illusion of depth before we ever cut a single hole.
Essential textural techniques:
- Grab your linoleum cutter and scrape away just the orange skin in a brick pattern.
- Vary your carving depth to simulate rough, uneven cobblestones.
- Leave the lighter underlying flesh intact so it glows softly later.
Etching takes serious time, but it transforms a basic carving into a 3D masterpiece. The soft glow radiating through the scraped flesh creates incredible ambiance. Ever wonder why professional pumpkins look so lifelike? This surface shading technique serves as their biggest secret!

Carving the Windows and Doors
Now grab your sharpest exacto knife. You will cut completely through the pumpkin wall for the main windows and the grand entrance. Start from the center of your design and work your way outward to maintain the pumpkin’s stability.
Always carve the smallest details first. If you hollow out the large front door immediately, the surrounding walls become incredibly fragile when you try to carve the delicate window panes above it. Use gentle, sawing motions rather than applying brute force. A slow, steady hand prevents accidental snaps and keeps your miniature mullions completely intact.

Adding Faux Stained Glass
Want to truly blow your neighbors’ minds this Halloween? Add faux stained glass to your architectural windows. Glue colored tissue paper or thin sheets of colored vellum to the inside of the pumpkin wall right behind your carved openings. When you drop a bright light inside, the windows glow in eerie shades of deep purple, poison green, and dark crimson. I tried this brilliant trick with deep red vellum behind a tiny rose window design, and the final look genuinely belonged in a spooky art gallery. It adds a wildly colorful dimension to the classic orange glow.

Lighting Your Miniature Mansion
Lighting completely defines your architectural mood.
Real candles provide flickering, authentic shadows, but they generate intense heat. Heat cooks the roof of your beautifully carved house!
I highly recommend sticking strictly to bright LED puck lights.
Drop two or three high-lumen, remote-controlled LED lights inside your pumpkin. You can even use color-changing LEDs to cast a spooky green or purple aura through the open doors, while the etched brickwork glows a warm amber. Plus, you never have to worry about the wind blowing out your masterpiece on Halloween night.

Preserving Your Architectural Art
Nothing breaks my heart more than watching a meticulously carved gothic manor rot and collapse after just three days. You spent hours on those tiny brick textures, so preservation plays a vital role.
Smear a thin layer of petroleum jelly over all exposed cut edges to lock in moisture. Alternatively, spray the entire interior and all carved surfaces with a diluted bleach solution to keep mold at bay. Store your pumpkin in a cool, shaded area during warm afternoons to drastically extend its lifespan. For more porch inspiration, check out our tips on displaying vintage Halloween decor around your new carved masterpiece.

Displaying Your Creation
A standalone pumpkin looks great, but staging it elevates the entire scene.
Treat your carved mansion like the centerpiece of a tiny haunted village. Surround the base with dried Spanish moss, faux autumn leaves, and miniature skeletons to complete the eerie landscape.
Elevate your pumpkin on an overturned wooden crate or a rustic metal stand so visitors can easily admire those delicate etched details at eye level. If you place it flat on the ground, people completely miss the intricate cobblestone work you painstakingly scraped into the rind! 😎

Adding Spooky Landscaping Details
Never throw away those thick chunks of pumpkin rind you cut out from the large doors and main windows! You can easily repurpose those solid scraps to create spooky landscaping for your miniature estate. Grab your craft knife and carefully whittle tiny tombstones, twisted barren trees, or even miniature gargoyles. Secure these little accessories around the base of your architectural pumpkin using sturdy wooden toothpicks. It adds an entirely new layer of 3D depth to your Halloween display, and honestly, it makes you look like an absolute carving genius to your neighbors. Waste not, want not, right?

Fixing Accidental Mistakes
We all make mistakes, especially when carving delicate window frames. If you accidentally snap a crucial pillar or a slender window mullion, do not panic and throw the pumpkin out.
You can easily perform emergency surgery using standard wooden toothpicks. Simply snap a toothpick to the right length, push it firmly into the broken structural piece, and carefully pin it back into place on the main wall. Once the LED illuminates the pumpkin in the dark, no one will ever notice your sneaky little repair job. I have rebuilt entire collapsed cathedral roofs using this simple trick, and it saves the day every single time!

Conclusion
Carving an architectural pumpkin requires patience, the right tools, and a bit of elbow grease, but the jaw-dropping results are completely worth the effort. Ditch the basic designs this year and transform your porch into an illuminated gallery of tiny glowing mansions. Which architectural style are you carving first? Let me know in the comments!
Related posts
See AllHow to Build a Modern Glass-Walled Garden Fitness Room
Build the ultimate backyard gym with our guide to modern glass-walled garden fitness rooms. Discover framing, flooring, climate control, and …
Read moreThe Pipe Framework Guide: Building Custom Vertical Plant Supports
Build rugged, beautiful custom vertical plant supports using industrial pipes to give your heavy climbing plants the ultimate structural upgrade.
Read more10 Slate Gray Concrete Patio Ideas for a Sleek, Modern Look
Transform your backyard with these 10 slate gray concrete patio ideas. Discover sleek, modern designs, smart material pairings, and lighting …
Read moreA Practical Guide to Hosting 100 Guests in Your Yard
Planning a massive backyard party? Discover practical tips for hosting 100 guests without losing your mind, from traffic flow and …
Read more