












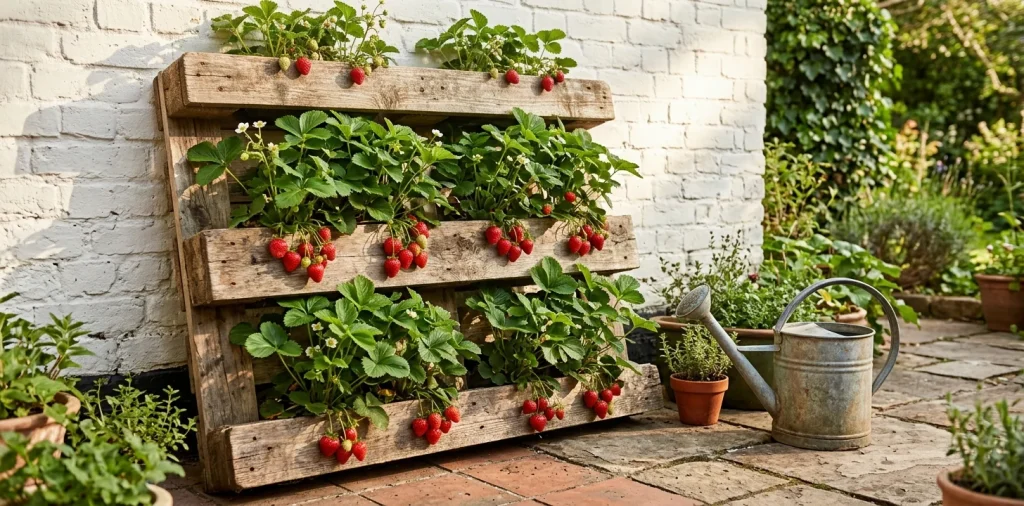

You want fresh strawberries, but your outdoor space is basically a glorified postage stamp. I completely understand the struggle. Luckily, building a vertical pallet garden solves the space issue while looking incredibly rustic and charming. I promise you do not need a woodworking degree to pull this off. Let me show you exactly how to build one.
Why You Need a Vertical Strawberry Wall
Let’s address the elephant in the room. Traditional strawberry patches take up way too much precious square footage. A vertical setup reclaims that lost space instantly. You simply lean it against a sunny wall, and suddenly you have a massive growing area.
Plus, getting the fruit off the ground keeps pests away. Slugs absolutely hate climbing rough wood, which means more pristine berries for you and fewer half-eaten disappointments. Who actually enjoys sharing their harvest with garden bugs? Not me, FYI. 🍓 Besides, harvesting becomes a total breeze. You just stand there and pluck sweet berries at eye level instead of breaking your back squatting in the dirt. Trust me, your knees will thank you later.

Sourcing Safe Pallets Without Breaking the Law
Finding free wooden pallets feels like a modern treasure hunt. Check behind local hardware stores or garden centers, but always ask permission before hauling anything away. You absolutely must check the stamps on the wood before taking it home. Look specifically for the “HT” (Heat Treated) stamp. This means the manufacturer cured the wood with heat rather than toxic chemicals. Avoid “MB” (Methyl Bromide) pallets like the plague unless you fancy a side of poison with your morning fruit salad. Nobody wants glowing strawberries. Clean, safe wood makes the foundation of a healthy vertical garden.

Prepping the Wood Like a Pro
First, grab a crowbar and remove every single rogue nail sticking out.
Next, run a coarse grit sandpaper over the rough edges. You do not need to make it perfectly smooth like luxury furniture. We just want to avoid nasty splinters when you water your plants.
Then, consider painting or sealing the wood. A non-toxic outdoor sealant drastically extends the lifespan of your setup. I left my first pallet raw, and it basically rotted away in three seasons.
Essential prep tools:
- Heavy-duty crowbar
- Coarse grit sanding sponges
- Non-toxic weatherproof wood sealant

The Landscape Fabric Stapling Marathon
This step requires a heavy-duty staple gun and plenty of patience. You will create little fabric pockets behind each wooden slat to hold the dirt. Cut strips of quality landscape fabric, tuck them into the gaps, and staple them aggressively to the back and bottom of the slats.
Do not skimp on the staples here. Soil gets incredibly heavy when wet, and a blowout will dump your precious plants straight onto your patio. Ever seen a soil avalanche? It makes a spectacular mess. If you are setting this up on a small apartment terrace, you definitely want to prevent dirt spills. Renter-friendly balcony flooring tiles over concrete make cleanup much easier if an accident happens.

Crafting the Perfect Strawberry Soil Mix
Strawberries hate sitting in soggy dirt. They demand excellent drainage to thrive.
You need a lightweight potting mix heavily amended with perlite or pumice. Avoid heavy garden soil from your yard at all costs, because it compacts too tightly in those small fabric pockets. Compaction literally suffocates the delicate root systems.
I always mix in a generous handful of organic compost or worm castings before planting. This provides a slow-releasing nutrient boost that keeps the plants happy all summer long. IMO, good dirt is the secret sauce to fat, juicy berries.

Choosing the Right Strawberry Varieties
Not all strawberries behave the same way in vertical setups. You want to buy “Everbearing” or “Day-Neutral” varieties for a pallet garden. These types produce multiple smaller harvests throughout the summer and fall, keeping your fruit wall looking lush and productive. “June-bearing” types give you one massive crop and then quit for the year, which leaves your pallet looking a bit sad and leafy for months. Varieties like Seascape or Albion thrive beautifully in containers and produce incredibly sweet fruit. Pick the right plants, and you basically guarantee a non-stop berry buffet.

The Planting Layout Strategy
Start planting from the bottom row and work your way up.
This prevents dirt from falling onto the plants below as you fill the pockets. Gently tease the roots apart before tucking each plant into its new fabric home. Pack the soil firmly around the base to eliminate any hidden air pockets.
You should space the plants about six to eight inches apart within the slats. Crowding them causes poor air circulation, which invites nasty fungal diseases.
Leave the top row for trailing companion plants if you want extra visual flair. French marigolds look fantastic up there and naturally repel certain garden pests.

Watering Your Vertical Masterpiece
Gravity works against you here. Water naturally rushes straight down, often leaving the top rows bone dry while drowning the bottom ones. You must water slowly and deliberately at each level. A watering can with a long, narrow spout works wonders for reaching into those tight gaps between the wooden slats.
If you want to automate the process, install a simple drip irrigation line along the top of each row. I finally added a drip system last year, and it entirely changed my gardening game. No more standing there for twenty minutes with a heavy hose. By the way, if space is tight where your pallet sits, genius foldable furniture for narrow balconies pairs beautifully with vertical setups.

Feeding and Maintenance Routine
Your pallet garden acts exactly like a container, which means nutrients wash out quickly with frequent watering. You must feed these hungry plants regularly to maintain berry production.
Apply a liquid organic fertilizer every two weeks during the growing season. Just mix it into your watering can and pour it directly onto the soil, not the leaves. I prefer a fish emulsion blend, even though it smells absolutely terrible for about an hour.
Snip off any dead leaves and aggressive runners as soon as you spot them. Runners drain energy away from fruit production. We want berries, not a tangled jungle vine situation! 🌿

Winterizing the Pallet Garden
Winter poses a massive threat to above-ground roots. Cold air freezes the exposed soil much faster than it would in the actual ground. Once the first hard frost hits, you need to protect your plants. I highly suggest moving the entire pallet into an unheated garage or shed if possible. If you must leave it outside, wrap the whole structure in heavy frost cloth or thick burlap. Pack dry straw around the base for extra insulation. Treat them right over the winter, and they will bounce back with aggressive green growth the second spring arrives.

Conclusion
Building a vertical strawberry pallet garden offers an incredibly rewarding weekend project. You maximize your growing space, keep pests at bay, and get to snack on fresh berries all season. Are you ready to start hunting for the perfect heat-treated pallet? Let me know in the comments below which strawberry variety you plan to plant first!
Related posts
See AllStyling Macramé and Rattan for an Authentic Boho Balcony
Transform your boring balcony into an authentic bohemian oasis using the magic of macramé and rattan. Get practical styling tips, …
Read moreCapturing the Coastal Grandmother Essence: 10 Wedding Ideas
Ready to channel your inner Nancy Meyers for your big day? Discover 10 breezy, elegant Coastal Grandmother wedding ideas that …
Read more15 Matte Black and Cedar Porch Ideas for a Striking Modern Farmhouse Facade
Give your modern farmhouse facade a serious upgrade. Discover 15 striking matte black and warm cedar porch ideas to instantly …
Read more15 Sleek Concrete Mini Pond Ideas for an Industrial Chic Patio
Upgrade your patio with these edgy, modern concrete mini pond ideas. From fire-and-water bowls to brutalist troughs, discover how to …
Read more