


Ever tried enjoying a lovely summer afternoon outdoors, only to feel your skin actually roasting? 🥵 I certainly have. I once spent an entire July cooking on my patio because I lacked proper cover. You deserve a cool, breezy outdoor sanctuary where you can sip your iced coffee without melting. I will walk you through creating the ultimate shaded retreat, step by step.
The Magic of a Well-Placed Pergola
Why should you dedicate your precious weekend to sweating over lumber? A pergola completely transforms a harsh, sun-baked patio into a usable, stunning outdoor living room. You get beautiful filtered light, striking architectural details, and a serious boost to your property value. IMO, it offers the best balance between an open sky and a solid patio roof.
Have you noticed how luxury resorts always feature those slatted wooden structures? They use them because they work perfectly. Building it yourself saves thousands of dollars compared to hiring a contractor.

Navigating the Boring Red Tape
Before you rush off to the hardware store, we need to address the boring stuff. 📝 You must check your local building codes and HOA guidelines immediately. Nothing ruins a DIY project faster than an angry city inspector forcing you to tear down your beautiful new structure. FYI, most cities require a permit for structures over a certain height or square footage. Do your homework first! Call your local permitting office and ask exactly what they require for an unattached shade structure. It takes ten minutes and saves you massive headaches later on.

Selecting Your Ideal Wood
Your specific climate dictates your material choices entirely. Cedar reigns supreme for natural wood backyard builds.
Cedar naturally resists rot and invasive insects, making it incredibly durable for tough outdoor projects in damp environments.
I used rough-sawn cedar for my own backyard shade structure, and the wonderful earthy smell alone makes the investment worthwhile. Top material options:
- Rough-sawn western red cedar
- Kiln-dried premium redwood
- Pressure-treated southern yellow pine
Redwood also provides excellent weather resistance, though it usually costs significantly more. If you choose pressure-treated pine to save cash, you must stain and seal it religiously to prevent warping.

Exploring Low-Maintenance Alternatives
Do you absolutely hate the idea of sanding and staining wood every couple of years? 🙅♂️ Aluminum or vinyl kits offer fantastic, stress-free alternatives for busy homeowners. They wipe clean effortlessly and never require a fresh coat of messy sealant. Just remember that cheap vinyl looks exactly like cheap vinyl. If you go the synthetic route, invest in a high-quality, heavy-duty kit. Many modern aluminum options feature brilliant wood-grain finishes, giving you that rustic aesthetic without the endless maintenance chores. Pick the material that truly fits your lifestyle!

Mapping Out Your Layout
You cannot simply start digging holes in your yard and hope everything magically lines up perfectly. Precision during the initial planning phase dictates the overall success of your entire project.
Grab some sturdy wooden stakes and brightly colored mason line. Map out the exact footprint of your new structure directly on the grass.
Does the placement block any essential walkways? Does it sit a little too close to your roofline? Take a step back and visualize the flow of daily traffic. I highly suggest leaving at least three feet of open clearance around the perimeter so you can easily maneuver a lawnmower or paint brush later.

Anchoring the Foundation Properly
A strong windstorm will absolutely launch a poorly secured pergola right into your neighbor’s yard. You cannot just rest the heavy posts on your patio tiles and blindly hope for the best. You need solid, deep concrete footings. Dig your post holes well below the local frost line, pour quick-setting concrete, and install heavy-duty metal post bases.
These sturdy steel anchors keep the untreated wood elevated off the wet ground, preventing rapid rot while locking the entire structure firmly in place. Think of a solid concrete foundation as your ultimate insurance policy against bad weather.

Raising the Main Posts
Now comes the fun part where your weekend project actually starts looking like a real building! 🛠️ You will stand up your hefty corner posts first, securing them tightly to the metal brackets you just set in the concrete. You definitely need a reliable friend for this crucial stage. Trying to balance a heavy six-by-six wooden post while operating an impact driver usually ends in a frustrating disaster. Grab a buddy, bribe them with some good pizza 🍕, and get to work immediately. Use a high-quality post level to ensure every single upright stands perfectly plumb before tightening.

Attaching the Support Beams
Once the massive upright posts stand tall and plumb, you attach the main support beams across the entire top section.
Use thick galvanized carriage bolts rather than standard wood screws for these critical structural connections.
Standard screws can easily snap under extremely heavy loads. Thick metal bolts will hold your heavy beams securely for decades.
Clamp the wooden beams tightly to the corner posts before you start drilling your pilot holes. This simple carpenter’s trick prevents the heavy wood from slipping and completely ruining your precise measurements. Take your time here!

Installing the Overhead Rafters
With your main beams bolted securely in place, you finally get to lay down the overhead rafters. These horizontal cross-pieces create that classic, architectural grid look we all absolutely love. Cut decorative tails into the ends of your rafters using a sharp jigsaw before installing them; it adds a gorgeous custom touch that elevates the whole backyard design. Space them evenly across the main support beams, typically about sixteen inches apart. Secure each rafter using specialized structural hurricane ties or long timber screws driven straight down through the top.

Customizing Your Shade Level
The top slats do the actual heavy lifting when it comes to blocking the blazing afternoon sun. ☀️ How closely you space these upper purlins determines your exact shade coverage.
If your backyard faces brutal western sun exposure, place the wooden slats closer together or angle them slightly to block the harsh rays.
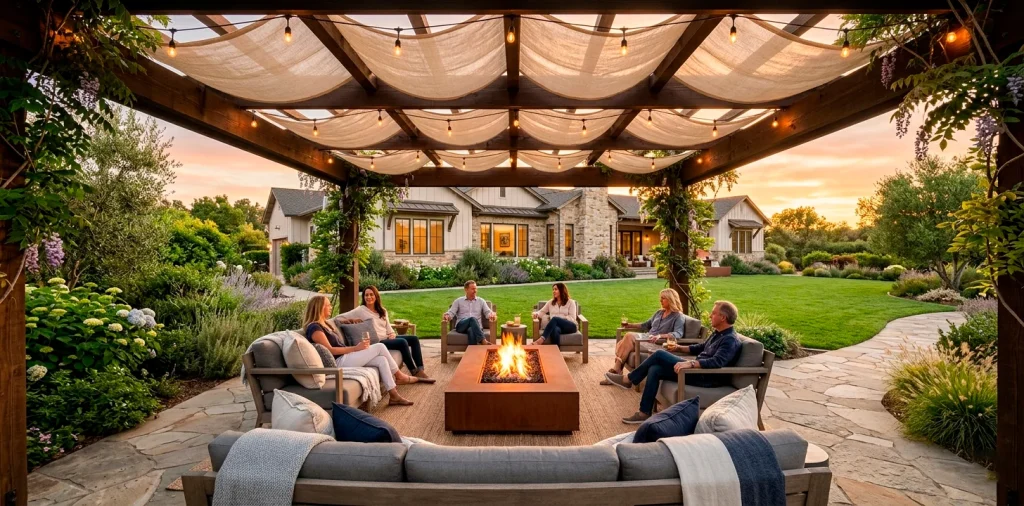
Want even more reliable protection? You can drape UV-resistant outdoor fabric across the top rafters. I added a retractable canvas canopy to mine last year, and it completely revolutionized how we use the outdoor space during peak summer hours.

Weatherproofing and Protection
You just spent a small fortune and a whole exhausting weekend building this backyard masterpiece; do not skip the final protective finish! Raw wood turns a dull, dingy gray when exposed to harsh UV rays and relentless rain. You must apply a high-quality exterior penetrating stain and sealer.
Transparent oil-based stains highlight the natural wood grain beautifully while actively repelling rain water. 💦 Apply the finish using a garden pump sprayer for incredibly fast coverage, then back-brush it deeply into the wood fibers. Reapply this protective coat every two to three years to keep your structure looking brand new.

Styling Your New Shaded Oasis
Your wooden structure looks structurally perfect, but now you need to make it feel cozy and inviting. ✨ I highly recommend planting fast-growing climbing vines like lush wisteria or star jasmine near the base of your corner posts. They climb the wood beautifully and provide natural, incredibly fragrant shade. Next, weave some warm-white commercial string lights through the overhead rafters to create an inviting, magical evening atmosphere. Throw in a textured outdoor rug, a sleek fire pit, and comfortable seating, and you will practically live out here. If you need some brilliant inspiration to complete your setup, check out these 15 multifunctional furniture ideas for a small patio.

Conclusion
Building a backyard pergola demands some serious sweat equity, but the payoff transforms your lifestyle completely. You just created a permanent vacation spot right outside your back door! Now you can finally host those summer barbecues without roasting your guests alive. Which beautiful climbing plant are you grabbing first? Let me know in the comments below!
Related posts
See AllHow to Build a Modern Glass-Walled Garden Fitness Room
Build the ultimate backyard gym with our guide to modern glass-walled garden fitness rooms. Discover framing, flooring, climate control, and …
Read moreThe Pipe Framework Guide: Building Custom Vertical Plant Supports
Build rugged, beautiful custom vertical plant supports using industrial pipes to give your heavy climbing plants the ultimate structural upgrade.
Read more10 Slate Gray Concrete Patio Ideas for a Sleek, Modern Look
Transform your backyard with these 10 slate gray concrete patio ideas. Discover sleek, modern designs, smart material pairings, and lighting …
Read moreA Practical Guide to Hosting 100 Guests in Your Yard
Planning a massive backyard party? Discover practical tips for hosting 100 guests without losing your mind, from traffic flow and …
Read more